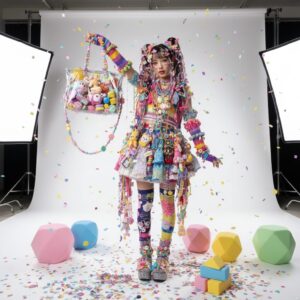
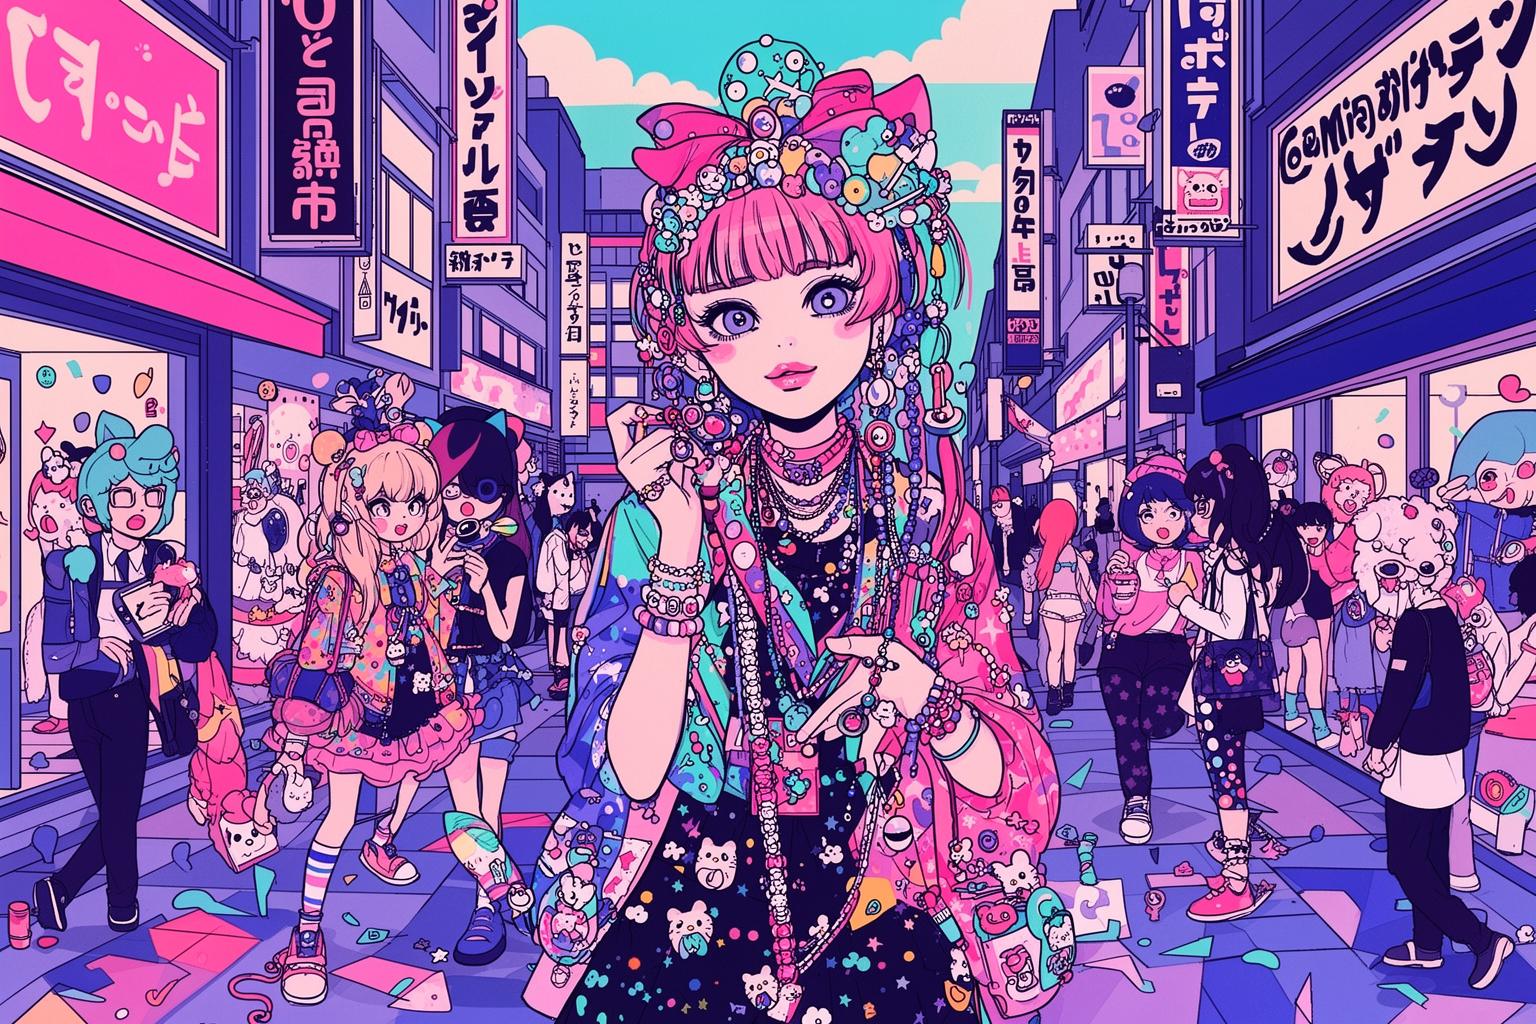
You’ve seen the pics, for real. The social media posts that stop your scroll cold. A human being so utterly drenched in color and plastic that they look like a walking, talking vending machine of pure joy. We’re talking about Harajuku, but not the tourist-trap crepe shops. We’re talking about the soul of the streets, the beating heart of DIY fashion—Decora. It’s a tidal wave of rainbow clips, a symphony of sparkle, a chaotic explosion of everything cute, clashing, and cool. And the first question that hits your brain is probably, “Why?” Like, is this for a party? Is it a costume? Is it comfortable? But that’s looking at it from the outside. The real question isn’t just why, but how. How does this aesthetic even come to be? Because here’s the secret sauce, the main character energy of it all: Decora isn’t bought, it’s built. It’s a philosophy of more is more, a personal statement forged in glue and glitter. It’s a wearable art form where the artist, canvas, and gallery are all you. Before we dive into the nitty-gritty of turning a pile of plastic into a masterpiece, let’s get our bearings. We’re heading to the spiritual home of this entire vibe, a place that’s less a street and more a living runway. This is the epicenter, ground zero for kawaii chaos.
To truly understand this philosophy of maximalist self-expression, it’s helpful to explore other facets of Japan’s kawaii culture.
The ‘Why’ Before the ‘How’: Decoding the Decora Vibe
To understand this, you need to rewind time. We’re not merely attaching one thing to another; we’re connecting to an entire cultural wavelength. This is more than just flashy style—it’s a genuine form of self-expression rooted in a particular era and place. It’s a vibe, a wearable rebellion, and grasping its origins is essential to making your accessories stand out with true energy, rather than resembling a craft store mishap. It’s the difference between speaking a language fluently and shouting random words. So before your hands get sticky, let’s align your mindset with the Harajuku icons who started it all. This is the cultural download you need—the background that transforms a bunch of charms into a statement. This is the essence of the sparkle.
A 90s Throwback with a Purpose
Check this out: late 90s and early 2000s Japan. The economy’s in turmoil following the bubble burst, and the culture is divided. On one side, you’ve got the ultra-minimalist, sleek designer fashion scene—all beige and black, super serious, very grown-up. On the other, there’s the strict social order: school uniforms, office suits, an intense pressure to blend in and avoid trouble. Now imagine being a teenager in that world. You’re full of energy and ideas, but society demands silence, sameness, and invisibility. What do you do? You scream. In Harajuku, that scream was visual. Decora—short for “decoration”—was born on the streets as a loud, direct rejection of high-fashion seriousness and social conformity. This style wasn’t dreamed up by designers in studios; it was created by kids hanging out, swapping ideas, and assembling looks from cheap, found items. This was the era of magazines like FRUiTS, basically the street style bible. Photographer Shoichi Aoki roamed the streets snapping shots of real kids rocking the coolest styles. No models, no sets—just genuine youth, clothes, and creativity. Those pages felt like a transmission from another world, a place where you could be whoever you wanted. Decora was a declaration: “I’m here, I’m visible, and you’ll have to deal with my sparkle.” It was a vibrant, noisy, joyful protest against being just another face in the crowd.
Kawaii on Overdrive: The Philosophy of Cute
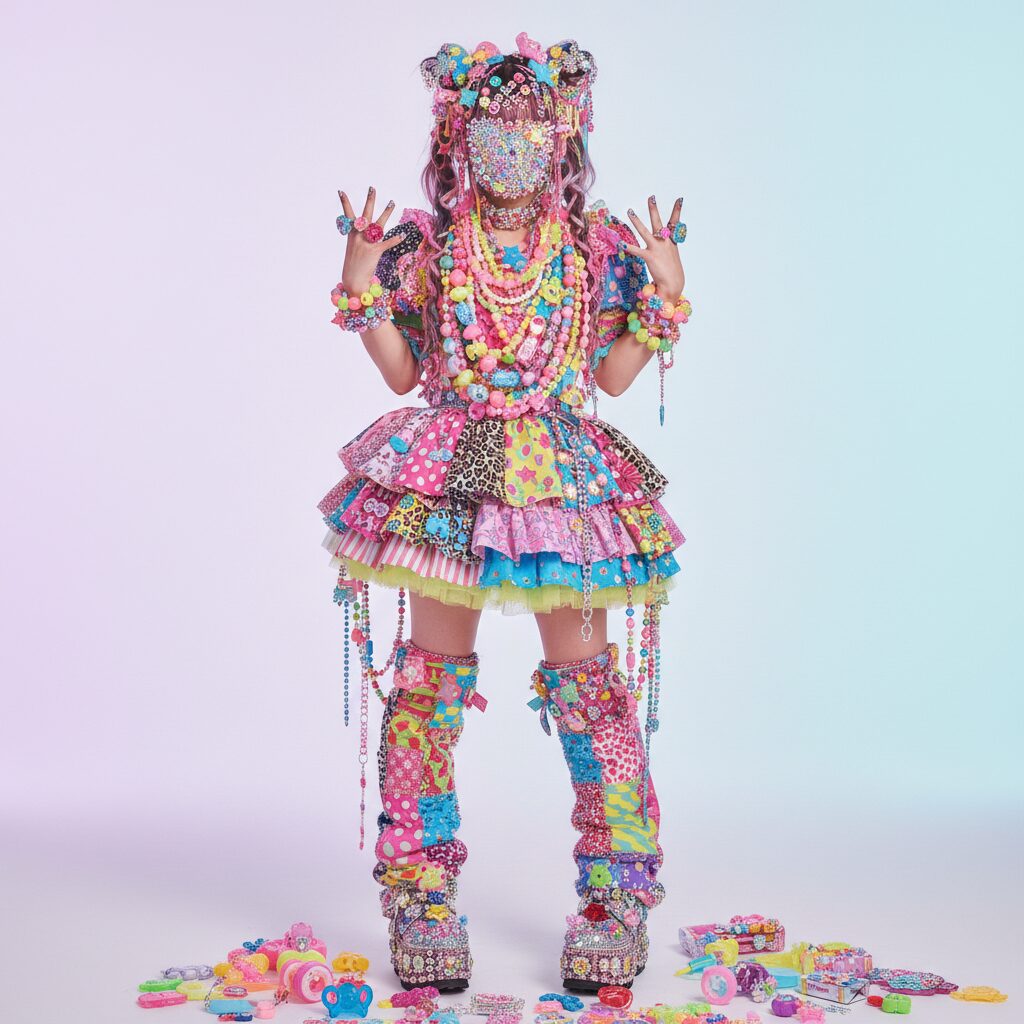
Now, let’s talk kawaii. If you’ve been online for more than five minutes, you know the word. It means “cute,” right? Well, yes—and no. In the West, “cute” often feels childish or trivial. In Japan, kawaii is an entire aesthetic universe, a deeply ingrained cultural value. It goes beyond looks; it’s a feeling. Kawaii can be comforting, disarming, and non-threatening. It creates a small, personal bubble of happiness and safety in a high-pressure world. It’s Hello Kitty, a perfectly arranged bento box, the cheerful chime of the train. It’s everywhere. Decora takes the core of kawaii and turns it up to eleven. It’s not just about liking one cute character—it’s about layering hundreds of them at once. It’s not a single pink bow; it’s twenty bows of different shades and sizes clipped to one spot. This maximalism isn’t accidental—it’s the whole point. It’s a deliberate choice to overwhelm with joy. By piling on countless cute, happy, nostalgic items, you build a shield—a wearable sanctuary. Every little plastic charm is a tiny dopamine hit, a flashback to childhood cartoons or favorite snacks. Together, they wrap you in a protective layer of pure, unapologetic happiness. It’s a visual broadcast of a joyful inner world, shared with everyone around you.
The DIY Ethos: It’s Not Store-Bought, It’s Soul-Crafted
This is the heart of Decora. You can’t just buy a “Decora kit”—that misses the essence entirely. The most admired, eye-catching, and legendary Decora styles are fiercely Do-It-Yourself. The real flex is in your personal vision and the dedication you pour into making it real. Anyone can buy a shirt, but can you spend eight hours carefully gluing 500 rhinestones onto dollar-store sunglasses? That’s passion. The DIY spirit is central to many Japanese subcultures, from customized cars to anime figurines. It’s about kodawari—a deep, obsessive commitment to craftsmanship. The time and care you put into something imbue it with a piece of your soul. A store-bought accessory is just an object; one you’ve built yourself, bit by bit, tells a story. It reveals your favorite colors, the characters you loved as a kid, your sense of humor. It’s a collage of your personality. When someone in Harajuku stops you to say your look is fire, they’re not just complimenting your style—they’re recognizing the work, creativity, and soul behind it. It’s a badge of honor, proof that you’re not merely a consumer, but a creator of culture.
Your Arsenal of Awesome: Assembling the Decora Craft Kit
Alright, theory time is done. Now it’s time to get practical. We’re about to assemble your creative war chest. Gathering your materials is a big part of the fun—it’s like a treasure hunt where the prize is pure creative potential. The goal isn’t just to buy things but to carefully curate a collection of pieces that truly resonate with you. This is your palette, your visual vocabulary. We’ll break down every component you might need, from large foundational elements to the tiniest specks of glitter. Don’t feel overwhelmed; think of this as your guide to the candy store. You don’t need everything at once, but knowing what’s available will ignite ideas and help you shape your unique style. Let’s gear up.
The Foundation: What Are You Blinging Out?
Before decorating, you need something to decorate. This is your canvas, the base of your creation. Your choice of foundation will influence your design’s shape, size, and function, so choose thoughtfully. But don’t be afraid to think outside the box. In Decora, almost anything can serve as a canvas for chaos.
- Hair Accessories: The classic, the original, the epicenter of Decora. Simple plastic hair clips, snap clips, bobby pins, and wide plastic headbands are your best friends. They’re inexpensive, come in countless colors, and provide a flat-ish surface perfect for gluing. Pro tip: lightly sand shiny plastic clips with fine-grit sandpaper to give glue a better grip and make your creation more durable. Metal clips work too, but be sure to use adhesive rated for both metal and plastic.
- Phone Cases: The modern Decora canvas. Your phone goes everywhere with you, so why shouldn’t it be as extra as you are? Clear silicone or hard plastic cases work best. A clear case lets you have a background image beneath your decorations, adding a personal touch. Hard plastic is easier to glue on but can crack if dropped. Silicone is harder to glue (you’ll need specific adhesives like E6000), but its flexibility helps absorb shocks and keep charms attached.
- Jewelry Bases: Don’t limit yourself to hair. Your wrists and neck are prime decoration spots. You can buy chunky plastic chain bracelets and necklaces at craft stores—ideal for attaching many dangly charms. Or go DIY by creating your own chains from oversized plastic links. For rings, look for adjustable bases with flat pads on top—a perfect stage for a single epic cabochon or a cluster of gems.
- Beyond the Basics: Why stop there? Think bigger. Old sunglasses with wide frames, a plain face mask decorated with lightweight gems along the edges, platform sneakers—the possibilities are endless. If you can hold it still long enough to glue something to it, it’s fair game for a Decora project. Here’s where you can really get wild and craft a statement piece no one else has.
The Main Event: Cabochons, Charms, and All That Jazz
This is the core of your creation. These are the shapes, characters, and colors telling your story. The variety can be overwhelming, but that’s what makes it exciting. You’re curating your own tiny museum of cute. In Japan, huge stores like Parts Club or Kiwa Seisakujo offer aisles of this stuff. Elsewhere, online shops like Etsy or bulk suppliers like AliExpress are your go-to. Let’s break down the categories.
Plastic Fantastic: Understanding Cabochons
A “cabochon” is a decorative piece with a flat back meant for gluing. It’s your primary building block and the star of the show.
- What to Look For: Themes are endless, but classic Decora favors a few key areas. Think hyper-nostalgic and hyper-cute. Cartoon characters from your childhood or Japanese anime are a must. Sanrio icons like Hello Kitty, My Melody, and Cinnamoroll reign supreme. Sweets are huge too—tiny ice cream cones, gummy bears, donuts, cookies, cakes. Basic shapes like stars, hearts, moons, bows, and wings add charm. The more colorful and cheerfully bold, the better.
- Material and Quality: Most are plastic or resin—lightweight, essential when stacking twenty on a single clip. Don’t worry about perfect quality; a bit of cheap, mass-produced look adds charm. This is about abundance and fun, not fine jewelry sophistication.
Dangly Bits: The World of Charms
Charms are cabochons’ cousins but with loops or holes for hanging. They add movement and sound, bringing another sensory dimension to your look.
- The Variety: Like cabochons, charms come in every shape and theme. Acrylic charms are light with printed designs (often anime). Metal enamel charms are heavier but vibrant. Resin charms are often handmade and can include glitter or embedded objects. Mixing textures and materials makes your piece more dynamic—flat cabochons paired with jangling acrylic charms instantly add interest.
- How to Use Them: You’ll need jump rings (small metal circles that open and close) and pliers to attach charms to your jewelry or accessories. It requires a bit of technique but is easy to learn and expands your design options.
Beads, Baubles, and Spacers
These are your supporting cast—the texture and filler tying your design together. Never underestimate the power of small details. A well-placed bead can elevate your work from good to outstanding.
- Alphabet Beads: A Decora essential. Spell out names, favorite words, phrases, or random letters for a chaotic vibe. The classic white cubes with black letters are iconic.
- Pearls and Rhinestones: Not the real deal, but plastic or acrylic half-domed pearls and sparkling rhinestones. Perfect for filling tiny gaps and catching light with blinding sparkle. Get a range of sizes and colors.
- Thematic Beads: Pony beads bring nostalgia and playfulness. Shapes like stars, hearts, flowers, and butterflies reinforce themes and work well strung on bracelets or dangling charms.
- Spacer Beads: Unsung heroes—small, simple beads (metal or plastic) that separate your featured beads on strings or wires, giving them room to shine and controlling your design’s rhythm and flow.
The Glue That Holds the Galaxy Together: Adhesives and Tools
Your vision needs the right materials to come alive. Using the wrong glue risks heartbreak when your piece falls apart on day one. The right tools make the process smoother, more precise, and way more enjoyable. This is your technical setup.
Choosing Your Weapon: Glue
- Industrial Strength Adhesives (e.g., E6000, Gem-Tac): Your workhorse. To stick plastic or resin cabochons to plastic, metal, or phone cases, you need something strong. E6000 is a classic—it dries clear, bonds firmly, and flexes a little to prevent popping off. The downside? Fumes are serious. Use it in a well-ventilated space, maybe with a fan. Gem-Tac is a good alternative, especially for rhinestones—less smelly, dries crystal clear.
- Silicone Whipped Cream (Deco Cream/Deco Sauce): The secret behind that iconic, fluffy, dessert-like Decora style. A thick silicone paste, often in a tube with piping tips like cake frosting. You pipe it onto surfaces to create puffy textures, then press cabochons and charms into it while wet. Comes in colors like white, pink, pastel blue, and yellow. “Sauce” bottles let you drizzle colored glue for chocolate or strawberry syrup effects. A game-changer for over-the-top sweet aesthetics.
- UV Resin: The next level. Liquid plastic that cures rock-hard under a UV lamp in minutes. More investment due to lamp and resin but offers amazing possibilities. Use it as a strong, clear topcoat to seal and protect. Mix in glitter or pigments, or pour into molds for unique cabochons. Allows customization and professionalism beyond glue alone.
The Artisan’s Toolkit
- Tweezers: Trying to place tiny rhinestones with fingers is madness. Fine-tipped craft tweezers are essential for precision.
- Wax-Tipped Pick-Up Tool: A pro tip. This small tool with a waxy tip lets you pick up one rhinestone or pearl and set it on glue quickly and accurately. Faster and easier than tweezers for flat-backed small items—pure magic.
- Pliers: For charms and jump rings, you need two pairs of pliers—flat-nose to hold the ring and round-nose or another flat-nose to twist it open. Always twist jump rings open sideways, never pull, to keep their shape.
- Workspace Protection: Don’t work on your nice dining table. Use a silicone craft mat, cardboard, or wax paper. Glue can be messy, and resin bonds permanently. Protect your space.
- Extras: Toothpicks or orange sticks help apply small glue dabs. Small disposable cups and popsicle sticks are great for mixing resin with glitter or colors. Stay organized—a craft box with multiple compartments keeps your mountain of charms and beads from becoming a tangled mess.
The Creation Process: From Blank Canvas to Kawaii Overload
Alright, you have your supplies ready. Your desk is now layered with more plastic and sparkle than a 90s toy store. So, what’s next? This is where the magic unfolds. Creating a Decora piece is a sacred ritual—a blend of careful planning and joyful chaos. It’s about layering, storytelling, and knowing exactly when to add just one more star. We’ll guide you through the entire process, from that initial spark of inspiration to the anxious wait as the glue dries. This isn’t a strict set of rules but a helpful guide to discovering your own creative rhythm.
Step Zero: Brainstorming Your Vibe
Don’t just start gluing randomly—that’s how you end up with a dull, muddy mix of colors. The best Decora looks, as chaotic as they may appear, have a solid internal logic. There’s a plan. Think of this as the “sketching” phase, but instead of pencils, you’re sketching with tangible objects.
- Find Your Color Story: This is the single most crucial decision you’ll make. A well-chosen color palette distinguishes a masterpiece from a mess. A classic choice is a full-on rainbow explosion, but you can achieve a more refined yet striking effect by sticking to a theme. Go all pastel (pink, baby blue, mint green, lavender). Try a neon theme that glows under blacklight. Or opt for a monochromatic look—all pinks, from bubblegum to hot pink—which can be incredibly impactful. Pick two to four main colors, then add an accent color (like gold or silver).
- Choose a Central Theme: This will guide your cabochon and charm selections, helping your piece feel cohesive. Themes can be anything, but favorites include: Desserts & Sweets (ice cream, cake, candy), Space & Stars (planets, aliens, moons, rockets), Spooky Cute (ghosts with bows, pastel skulls, friendly bats), or focusing on a specific character and building a world around them. Imagine a My Melody-themed piece—probably lots of pink, flowers, and maybe some tiny music notes.
- The Layout: Before applying a single drop of glue, arrange all your potential pieces on your canvas. Move them around and observe how they interact. Start with your biggest, centerpiece cabochons—your “hero” pieces—and place them strategically. Fill in the gaps with medium-sized pieces, then sprinkle smaller beads and potential rhinestone spots. Snap a picture with your phone. Walk away for ten minutes, then return. Does it still feel balanced? Does it tell the story you want? This pre-planning is essential and will save you from regrets later.
The Art of Layering: Building Your Masterpiece
Decora is all about richness and texture. You aren’t just decorating a flat surface—you’re crafting a tiny, wearable sculpture. Think in layers, building up from the base to achieve a visually dense and intriguing piece that invites close inspection.
The Base Layer: Establishing the Foundation
This is where commitment happens. Glue down your main, large pieces that you positioned during brainstorming. If you’re using deco cream, this is your moment to shine. Pipe a generous, fluffy layer of cream onto your canvas using a star-tipped nozzle to create pretty, defined swirls—think of frosting a cupcake. Once the cream base is spread, press your largest cabochons gently but firmly into it. The cream will squish around the edges, securing them in place. If you’re not using cream, apply industrial glue (like E6000) to the back of each cabochon and press it onto the canvas, holding for a few seconds to ensure good contact. Give your hero pieces some breathing room; you’ll fill in the spaces around them next.
The Mid-Layer: Filling in the Gaps
With your main pieces secured, it’s time to add the supporting cast—medium-sized charms, cabochons, and larger beads. This stage bridges the gaps between big pieces. Think three-dimensional. Don’t hesitate to overlap elements slightly—a star’s corner might tuck just beneath a big character cabochon, adding visual depth. Use tweezers for precision. If you’re working with deco cream, press pieces into the still-wet base. For glue users, add a small dot of glue for each item. You can also sprinkle in chunkier glitter on the base for added sparkle. This layer builds visual density and creates interesting connections among your elements.
The Bling Layer: All That Glitters
This final, and arguably most vital, layer delivers the signature Decora sparkle. The goal here is to cover every visible inch of canvas. Tiny rhinestones, half-pearls, and microbeads come into play now. It’s painstaking, meditative work. Using a toothpick, apply tiny dots of glue (Gem-Tac works well) into gaps, then pick up individual rhinestones with a wax-tipped tool or tweezers and place them on the glue dots. Repeat endlessly, filling even the smallest spaces. Trace the contours of larger pieces with rhinestone lines. If any original canvas shows through, add a rhinestone. This creates a dazzling, light-catching effect—the difference between a cute accessory and a true piece of Decora art. It’s the finishing polish—the final 10% effort that yields 90% of the impact.
Finishing Touches and Curing
You’re nearly done. The main assembly is complete, but a few final steps ensure durability and polish.
- Adding Dangles: If your piece has hanging elements, now’s the time to attach them. Use pliers to gently open a jump ring, loop it through the charm’s hole, then through your bracelet chain or a drilled hole in a hair clip. Twist the jump ring closed tightly, making sure the ends meet perfectly to prevent snagging.
- Sealing Your Work: This step is optional but highly recommended for pieces that will endure heavy use, like phone cases. A top coat seals everything, adding a glossy, uniform finish. Carefully apply a layer of Mod Podge Dimensional Magic, which dries clear and hard. For extra durability, encase the entire piece in a thin layer of UV resin and cure under a lamp—making your work virtually indestructible.
- The Agony of Curing: The hardest part—waiting. Let your creation rest undisturbed until the adhesive is fully cured. E6000 takes 24 to 72 hours for maximum strength. Deco cream needs at least a full day to harden. Wearing your piece too soon risks pieces falling off or being crushed. Find a dust-free, flat spot to lay it down, then step away. Patience is your final, essential ingredient.
Beyond the Accessories: Living the Decora Life
So, you’ve done it. You now own a one-of-a-kind, wildly extravagant, personally significant piece of Decora art. What’s next? The final step is to wear it. Wearing Decora is a statement. It’s an experience. It’s more than just putting on an accessory; it’s about embodying the philosophy behind it. Recognizing the role it plays once it leaves your workspace and enters the world is the last puzzle piece of the culture.
It’s Not a Costume, It’s Armor
When you step outside fully decked out in Decora, you’re not dressing as a character. You’re amplifying yourself. Think of it as “kawaii armor.” In a world that often demands seriousness, conformity, and subtlety, Decora is a bold act of joy. It’s a proclamation that you won’t be dull, you won’t be invisible, and you refuse to take life too seriously. Every piece you wear is part of a protective shield made from things that bring you happiness. Feeling down? Covering yourself in rainbows and nostalgic cartoons is a valid mood booster. It creates a personal bubble of positivity you carry with you. It signals to the world that you belong to a tribe of creative, expressive people who prioritize personality over polish.
The Community and the Compliments
One of the most beautiful aspects of wearing this style, especially in its natural environment of Harajuku, is the social element. It sparks conversations. People will stop you on the street—not to judge, but to celebrate you. Others dressed in alternative styles will nod in respect or shout compliments. This is how connections happen. It’s a visual language that says, “I see you. I understand.” In Tokyo, this can even lead to being photographed for street style blogs or magazines, which is the ultimate mark of respect. It’s an acknowledgment of your creative effort. It allows you to participate in the vibrant, living fashion ecosystem that makes the area legendary. Your personal art project becomes part of the public street gallery.
The Evolution of Decora
Let’s be honest: Decora’s heyday as a dominant street style was in the early to mid-2000s. You won’t see legions of Decora fans roaming Takeshita Street daily like back then. But it’s far from gone. It hasn’t vanished; it’s evolved and gone global. The original spirit of Decora—the DIY attitude, colorful maximalism, layering, and celebration of cute—has influenced countless other styles. Its DNA is woven into modern e-girl aesthetics, festival fashion, and creative self-expression seen on platforms like TikTok and Instagram. It broke the rules so thoroughly that it created new tools for global self-expression. With craft supplies accessible online, you don’t have to be in Tokyo to join in. Decora has become a worldwide language of joyful, chaotic creativity.
Making your own Decora accessories is more than a hobby. It’s a history lesson, a cultural immersion, and a radical act of self-celebration all in one. It’s a tangible link to the rebellious spirit of 90s Harajuku kids—a way to fight back against the dullness of the world with a burst of color and noise. Your first creation may be messy. Glue might end up on your fingers. A cabochon might sit crooked. But none of that matters. It’s not about perfect technique. It’s about the joy of making, the freedom to express, and the bravery to wear your heart—along with a hundred plastic trinkets—on your sleeve, in your hair, and all over your life. It’s your chaos, your story. Now, go make some noise.